Zoom Integration
Installation
- Sign into Sonero and go to the Integrations page
- Click the Connect button for Zoom
- Click Authorize on the next page to grant Sonero the necessary permissions. (You must sign into your Zoom account if you’re not currently signed in).
- Once authorization is successful, your Sonero and Zoom accounts are connected. That’s it!
Usage
There are three ways to ensure that Sonero records and analyzes your meetings:
- Sonero, AI Assistant
- Zoom Cloud recordings
- Local recordings
Sonero, AI Assistant
Enabling Google Calendar integration will automatically allow the Sonero, AI Assistant to join events that use Zoom as the conference solution. The Sonero, AI Assistant will join Zoom calls regardless of recordings made by Zoom locally or to the cloud.
If you remove the Sonero, AI Assistant from the call, we will still rely on its recording for analysis, therefore, we may produce a truncated output.
Notes: The Sonero bot will only join meetings for which you are the host/organizer.
To integrate Google Calendar with Sonero and use the Sonero, AI Assistant, see instructions here .
Zoom Cloud Recordings
If you do not want to use the Sonero, AI Assistant, we can still record and analyze your meetings.
As long as Zoom is integrated with Sonero, whenever you record a Zoom meeting to the cloud, Sonero will automatically pick up your meeting recording, transcribe and process it, then notify you via email when the meeting summary is available. It’s that simple! (If you can’t record meetings to the cloud, see Local Recordings below).
- Schedule a meeting in Zoom. Note: We recommend you enable automatic cloud recording for all your meetings or when scheduling an individual meeting. Please see below for instructions on how to do this or refer to Zoom help documents.
- Start your Zoom meeting. If the meeting was not set to automatically record to the cloud, please click the Record to the Cloud button in Zoom.
- Once your meeting ends, Sonero will automatically process your meeting for analysis and send you an email
Enable automatic cloud recording for ALL your meetings:
- Sign into the Zoom web portal and click Settings
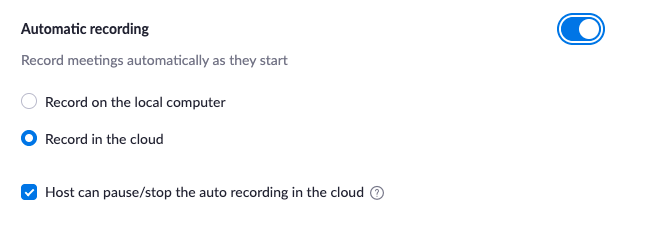
- Navigate to the Recording tab and verify that the Automatic Recording setting is enabled by changing the toggle to blue. Note: If the Status toggle is grayed out, it has been locked at either the Group or Account level, and you will need to contact your Zoom administrator
- Select Record in the Cloud
Enable automatic cloud recording for an INDIVIDUAL meeting:
- Click Schedule to create a new meeting
- Under Meeting Options or Advanced Options, check Automatically record the meeting
- Select In the Cloud and click Save
(Optional) Auto-delete cloud recordings in Zoom
Since Zoom allows very limited storage of cloud recordings, we recommend auto-deleting these recordings in Zoom. Besides, all your recordings will continue to live in Sonero which you can access at any time.
- Sign into the Zoom web portal and click Settings
- Navigate to the Recording tab and verify that the Delete cloud recordings after a specified number of days setting is enabled. If the setting is disabled, click the Status toggle to enable it. Note: If the Status toggle is grayed out, it has been locked at either the Group or Account level, and you will need to contact your Zoom administrator.
- Specify a time range in days and click Save

Local Recordings
If you are on Zoom’s Free Tier, you may not have the option to record to the cloud. Don’t worry, we’ve still got you covered. You can save your recordings locally and upload them to Sonero for processing.
- Schedule a meeting in Zoom
- Start your Zoom meeting. Note: We recommend you enable Automatic Recording. To do so, see below.
- If you do not have Automatic Recording turned on, remember to click Record
- Once your meeting ends, upload the meeting recording to Sonero by logging into the Sonero web portal and clicking Upload Meeting
- Sonero will automatically process your meeting for analysis and send you an email when complete
Enable automatic local recording for ALL your meetings:
- Sign into the Zoom web portal and click Settings
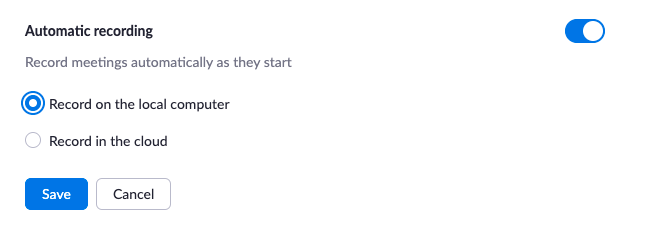
- Navigate to the Recording tab and verify that the Automatic Recording setting is enabled. If the setting is disabled, click the Status toggle to enable it. Note: If the Status toggle is grayed out, it has been locked at either the Group or Account level, and you will need to contact your Zoom administrator
- Select Local Recording and click Save
Uninstallation
- Sign in to your Zoom Account and navigate to the Zoom App Marketplace
- Click Manage > Installed Apps or search for the Sonero app
- Click the Sonero app
- Click Uninstall